
How to Apply Kinesiology Tape
If you’ve ever watched live sport on TV or from the sidelines, you might have noticed strips of colourful tape across shoulders, knees, backs and calves. This is kinesiology tape, and it is used to support the joints and provide pain relief for muscles without restricting movement. Kinesiology tape isn’t just for professional athletes; it can be used by anyone to aid in recovery from injuries, aches and strains.
While this clever tape is great for drug-free pain relief, it can be tricky to apply. This guide aims to cover all things kinesiology tape, including how to apply it to common areas.
Contents
How to tape an ankle with kinesiology tape
How to apply kinesiology tape to a knee
How to use kinesiology tape on a shoulder
How long can you keep kinesiology tape on?

What is kinesiology tape?
Kinesiology tape is a thin, stretchy, elastic tape designed to mimic the skin’s elasticity to provide support and pain relief for muscles and joints without restricting movement.
Kinesiology tape was first developed in the late 1970s by Japanese chiropractor Dr Kenzo Kase. Dr Kase wanted a tape that provided support without limiting movement like traditional athletic tapes did. Dr Kase developed the original Kinesio tape, or Kinesio Tex Tape. Today, there are over 50 brands on the market.
How to apply kinesiology tape
If you want to try kinesiology tape, consult a licensed physiotherapist who can show you the proper application technique for your specific complaint.
Generally, kinesiology tape is applied in an X, Y, I, or fan pattern, but it differs depending on what you need it for.
Preparation is also key. Make sure the area you’re applying to is clean and dry. You might also want to trim or shave any hair from the area. Otherwise, removal can get painful!
How to tape an ankle with kinesiology tape
Depending on your injury or condition, there are many ways to tape your ankle. The following are taping instructions for stability during exercise.
- Place the end of the tape on the outer ankle bone.
- Wrap the tape under your foot around the heel.
- Pull the tape up over the inner ankle bone toward the front of the foot.
- Bring the tape back over the inner ankle, across the top of the foot and back to the outer side, ending near the base of your toes.

How to apply kinesiology tape to a knee
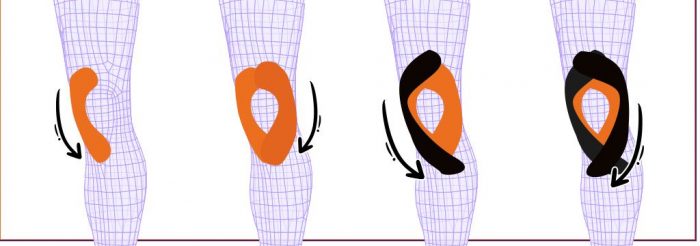
The best technique for taping your knee will depend on your symptoms. Here’s how to wrap for general knee pain.
Before beginning, you will need to cut four sections of tape. You’ll need two tapes 15cm long and two 20cm long.
- Sit on the floor with a slight bend in your knee, keeping it in this position throughout.
- Apply the first 15cm tape to the most painful area of the knee.
- Tear the release paper in half.
- Place the midsection under full stretch around the edge of the kneecap in a semicircle shape. Then attach the two anchors without stretching.
- Repeat with the second 15cm tape on the other side of the knee.
- Apply the two 20cm tapes under full tension, partly overlapping them.
How to use kinesiology tape on a shoulder
- Standing in front of a mirror, measure the length of the tape strips needed from the centre of the upper arm to the head of the shoulder.
- Cut three I-shaped tapes of equal length.
- Start with the middle tape. Without stretching it, place the base in the middle of the upper arm. Then, slightly stretch it towards the head of the shoulder and attach.
- Take the second tape and lightly attach the base to the first one. Stretch your arm slightly backwards and lightly stretch the tape around the sprint of the shoulder muscle, fixing the other end to the top of the shoulder.
- Place the base of the third tape next to the other two. Move your arm slightly forward, guiding the tape with a slight stretch over the back of the shoulder muscle. Fix the anchor at the top of the muscle, securing the anchor at the top of the shoulder.
- Rub all the tapes well to activate the adhesive layer.

How long can you keep kinesiology tape on?
Kinesiology tape can stay in place for several days, even as long as 5 days if applied correctly. While this is handy, it’s important to remove the tape if it’s becoming uncomfortable or causing irritation.
Skin irritation
Remove the tape immediately if you’re experiencing redness, itching or other signs of irritation on the skin.
Peeling
If the tape has started to peel or become loose, it’s time to remove it.
Reduced effectiveness
Tape can only effectively hold its tension and, therefore, be effective for so long, so it’s best to remove it after a few days, even if it’s still secure.
Removal tips
Removing anything adhered to the skin can be tricky, but it doesn’t need to be painful. Here are our top tips for removing kinesiology tape:
Remove in the shower
The steam and moisture from the shower will help loosen the adhesive, making it much easier to remove.
Use oil or lotion
Applying a small amount of oil or lotion to the edges of the tape should make it easier to lift and loosen the adhesive.
Slowly and gently
It’s best to remove the tape slowly and gently than trying to rip it off! Remove the tape in the same direction as your hair grows to minimise pain and reduce irritation.
Kinesiology tape at brace-yourself
Whether you’re a competitive athlete or simply looking for alternative support while exercising, our collection of kinesiology tape is here to help. Explore the collection or get expert guidance by emailing askaclinician@brace-yourself.co.uk.

Comments are closed here.